Getting started with Pipeline
Category : Devops | Sub Category : Jenkins | By Prasad Bonam Last updated: 2021-03-20 04:40:43 Viewed : 634
Getting started with Pipeline
Jenkins Pipeline is a suite of plugins that supports implementing and integrating continuous delivery pipelines into Jenkins. Pipeline provides an extensible set of tools for modeling simple-to-complex delivery pipelines "as code" via the Pipeline DSL. [1]
This section describes how to get started with creating your Pipeline project in Jenkins and introduces you to the various ways that a Jenkinsfile can be created and stored.
Prerequisites
To use Jenkins Pipeline, you will need:
Jenkins 2.x or later (older versions back to 1.642.3 may work but are not recommended)
Pipeline plugin, [2] which is installed as part of the "suggested plugins" (specified when running through the Post-installation setup wizard after installing Jenkins).
Read more about how to install and manage plugins in Managing Plugins.
Defining a Pipeline
Both Declarative and Scripted Pipeline are DSLs [1] to describe portions of your software delivery pipeline. Scripted Pipeline is written in a limited form of Groovy syntax.
Relevant components of Groovy syntax will be introduced as required throughout this documentation, so while an understanding of Groovy is helpful, it is not required to work with Pipeline.
A Pipeline can be created in one of the following ways:
Through Blue Ocean - after setting up a Pipeline project in Blue Ocean, the Blue Ocean UI helps you write your Pipeline’s
Jenkinsfileand commit it to source control.Through the classic UI - you can enter a basic Pipeline directly in Jenkins through the classic UI.
In SCM - you can write a
Jenkinsfilemanually, which you can commit to your project’s source control repository. [3]
The syntax for defining a Pipeline with either approach is the same, but while Jenkins supports entering Pipeline directly into the classic UI, it is generally considered best practice to define the Pipeline in a Jenkinsfile which Jenkins will then load directly from source control.
Through Blue Ocean
If you are new to Jenkins Pipeline, the Blue Ocean UI helps you set up your Pipeline project, and automatically creates and writes your Pipeline (i.e. the Jenkinsfile) for you through the graphical Pipeline editor.
As part of setting up your Pipeline project in Blue Ocean, Jenkins configures a secure and appropriately authenticated connection to your project’s source control repository. Therefore, any changes you make to the Jenkinsfile via Blue Ocean’s Pipeline editor are automatically saved and committed to source control.
Read more about Blue Ocean in the Blue Ocean chapter and Getting started with Blue Ocean page.
Through the classic UI
A Jenkinsfile created using the classic UI is stored by Jenkins itself (within the Jenkins home directory).
To create a basic Pipeline through the Jenkins classic UI:
If required, ensure you are logged in to Jenkins.
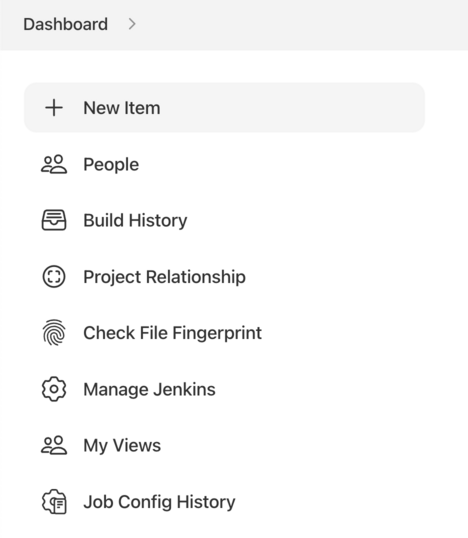
From the Jenkins home
page (i.e. the Dashboard of the Jenkins classic UI), click New Item at the top left.
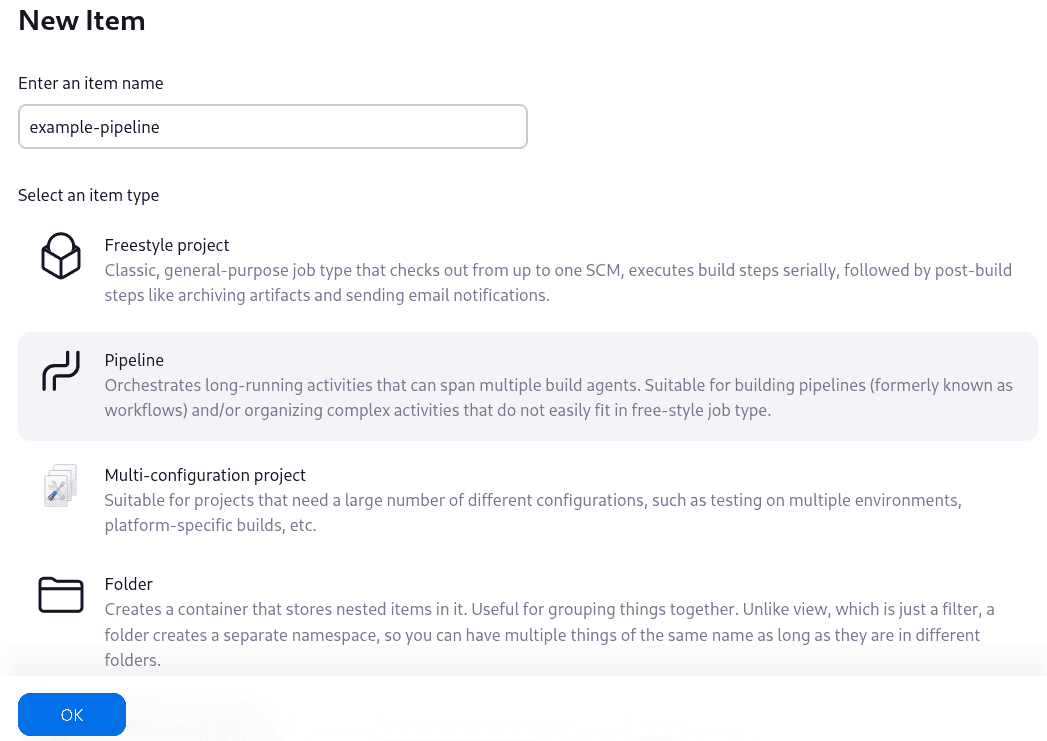
In the Enter an item name field, specify the name for your new Pipeline project.
Caution: Jenkins uses this item name to create directories on disk. It is recommended to avoid using spaces in item names, since doing so may uncover bugs in scripts that do not properly handle spaces in directory paths.Scroll down and click Pipeline, then click OK at the end of the page to open the Pipeline configuration page (whose General tab is selected).
Search
Categories
Related Articles
- Advanced Java interview questions
- Advantages of Factory Method pattern
- Apache Cassandra using the CQL
- Continuous Integration and Continuous Deployment (CI/CD) for Microservices
- Convert an RDD (Resilient Distributed Dataset) to a DataFrame in Apache Spark
- Create a topic with 3 partitions and a replication factor of 2
- CRUD (Create, Read, Update, Delete) operations between a React front end and a Spring Boot back end
- Data structure algorithms in Java
- Docker image and container
- Elasticity and High Availability Concepts
- Explain the Scala Anonymous Function
- Explain the Scala Anonymous Function
- Exporting and downloading a CSV file in Spring Boot:
- Git commands with examples
- How many male and female employees are there in the organization
- Import and export CSV files in a Spring Boot application
- Inversion of Control (IoC) container
- Java architect interview questions
- Java collections
- Java program that finds all pairs in an array that add up to a given sum
- java8 - Type annotations
- List, Set, and Map in Java
- Overview of Monolithic vs. Microservices Architecture
- Resilience, Scalability, and Fault Tolerance Principles
- Scala Match and Case expressions like a switch statement
- Scala - Multiple ways to iterate over a list
- Scala program examples
- ScheduledExecutorService with Callable
- some real-time use cases of Kafka along with examples:
- Spark - SparkContext, SparkConf, and SparkSession differences
- Spring Boot application with H2 in-memory database and CRUD (Create, Read, Update, Delete) operations
- Spring Security in a Spring Boot application
- The Databricks File System (DBFS) in Azure
- The Single Responsibility Principle (SRP)
- What is a Closure in Scala?
- What is Autowiring in Spring ? Explain Autowiring modes and limitations with examples
- Which transactional attribute is best approach in spring boot
- Zuul microservice
- A brief tutorial on React.js
- Abstract Factory Pattern
- Access Modifiers Available in Scala
- ACID properties
- ACID properties with examples
- Adapter Pattern
- Adapter Pattern
- Advantages of Scala over other programming languages.
- Advantages of Singleton design pattern in Java
- Aggregates, Entities, and Value Objects in Microservices
- an overview of the Executor Service and how to use it
- Apace Kafka Partitions example
- Apace Kafka Partitions with three brokers example
- Apache Kafka interview questions
- Apache Spark
- Apache Spark Features
- API Design and Best Practices (REST, GraphQL, gRPC)
- Apply the configuration to your Kubernetes cluster
- Asynchronous method implementation in threads in java
- Asynchronous REST API implementation
- Authentication and Authorization Strategies
- Autonomous Services and Decentralized Data Management
- AZURE data engineer interview questions
- Basic “Hello ” program of scala
- Basic overview on working with threads in Java:
- Benefits and Challenges of Microservices Architecture
- Benefits of design patterns
- Benefits of design patterns
- Best Practices for Designing, Developing, and Maintaining Microservices
- Binary search algorithm
- Binary Tree sorting in java
- BinaryGap – Codility – Solution
- Blue-Green Deployment and Canary Release Strategies in micro services
- Bridge Pattern
- Build a Docker image using a Dockerfile
- Build a Docker image using Jib
- Builder Design Pattern
- Building an Application with Spring Boot
- Building an application with Spring Boot
- Building real-world applications using Java 8 features
- Caching mechanism using the Singleton design pattern in Java
- Caching mechanisms in Java
- Can you explain how HashSet handles collisions?
- Can you explain the process of rehashing in a HashMap?
- Can you provide more Docker examples?
- Can you use custom objects as keys in a HashMap? What requirements should the key class meet?
- Case class examples in Scala
- Chain Of Responsibility Pattern
- Chaos Engineering and Resilience Testing
- CI CD Pipeline example in java
- Circuit Breaker design pattern
- Circuit Breaker implementation in spring boot code
- Circuit Breaker Pattern and Bulkhead Pattern for Resilience
- Classes
- Classes and objects in scala
- Closures and immutability in scala
- Command line design pattern in java
- Command Pattern
- Commmon interview questions related to Spring Boot
- Commmon interview questions related to Spring Boot
- Common collection operations in scala
- Common interview questions related to Spring Boot
- Commonly used Git commands
- Commonly used transactional attributes
- Comparison with Other Architectural Styles (e.g., SOA)
- Composite Pattern
- Concepts of Apache Kafka
- Concurrency and parallelism concepts in Scala
- Configure a MySQL database in a Kubernetes cluster,
- Configure a MySQL database in a Kubernetes cluster,
- Constructors in Scala
- Containerization with Docker and Kubernetes
- Control plane and data plane in Azure
- Control structures (if, while, for). in scala
- Core Java Inteview Questions
- Could you explain the role of load factor in a HashMap?
- Count the number of employees in each department in java8
- CountDownLatch in Java Concurrency
- Create a List that contains elements of different data types
- Create a Scala maven project
- Create accumulators and broadcast variables on the cluster programmatically in Apache Spark
- Create an Azure Databricks Workspace using Azure Portal
- Create and Insert a Hbase Table data using java
- Create and Run Spark Job in Databricks
- Create and Run Spark Job in Databricks with examples
- Create Kubernetes deployment and service YAML files.
- Creating a Maven multi-module project
- Creating a Maven multi-module project
- Creating a Table using HBase Shell
- Creating your first Pipeline
- CyclicRotation – Codility – Solution
- Data Consistency and eventual consistency in distributed systems
- Data durability in Apache Kafka
- Debugging a Kubernetes deployment using IntelliJ IDEA
- Declarative and programmatic transaction management
- Declarative and programmatic transaction management code examples
- Declarative Pipeline: Publishing HTML Reports
- Decorator Pattern
- Deeper look into Java threads:
- Deploy using Helm charts
- Deploy using standalone manifests
- Deploy using standalone single manifest
- Deploying a production-ready cluster on cloud providers (e.g., AWS, GCP, Azure).
- Deploying an application on Amazon EKS
- Describe the process of upgrading a Kafka cluster to a newer version with examples
- Design and develop microservices using Java related technologies
- Difference between map and flatMap
- Differences between SSL, HTTP, HTTPS, and TLS:
- Different ways of writing the Fibonacci Series in Java Program
- Different ways of Read and Write (Input/Output ) a file in Java
- Different ways to Check Whether a Number is Prime or Not
- Different ways to Find Factorial of a Number
- Differentiate between Null, Nil, None and Nothing
- Disadvantages of Factory Method pattern
- Disadvantages of Singleton design pattern in Java
- Distributed Tracing for Troubleshooting Microservices
- Docker Concepts
- Docker course content
- Docker workflow
- Domain-driven Design (DDD) for Microservices
- Download And Install Scala IDE
- Drools Course Content
- Event Sourcing and CQRS (Command Query Responsibility Segregation)
- Example of a Circuit Breaker implementation in Java using the Hystrix library
- Example of an Ansible playbook
- Example of cluster apache ZooKeeper for maintaining cluster metadata
- Example of how you can use transactions in Spring Boot
- Example of implementing a saga using local transactions in Java:
- Example of implementing an event-driven architecture in Java
- Example of implementing the Saga pattern using a simple Java code
- Example of using ArrayList, LinkedList, and Vector in Java
- Example of using MapReduce in Java
- Example of using YARN (Yet Another Resource Negotiator) in Java:
- Example using @Transactional
- examples of declarative and programmatic transaction management in Spring Boot:
- Executing Callable tasks using ExecutorService
- Executor And ExecutorService in Java
- ExecutorService using invokeAll () method
- ExecutorService using invokeAny () method
- Explain how Scala is both Functional and Object-oriented Programming Language?
- Explain npx create-react-app
- Explain Streams in Scala
- Explain the concept of Spring Boot Starters. Provide an example.
- Explain the difference between Spring and Spring Boot?
- Explain the functionality of Yield in Scala
- Explain the role of the Spring Boot Actuator. What endpoints does it provide?
- Explore the main components of Kafka architecture
- Expressions and operators.
- Facade Pattern
- Factory Method Pattern
- Factory Method Pattern
- Features introduced in Java 9
- File System utility(dbutils.fs) of Databricks Utilities in Azure Databricks
- First-class functions and higher-order functions in scala
- Flyweight Pattern
- FrogJmp – Codility – Solution
- Functions and methods in Scala
- Getting started with Jenkins
- Getting started with Minikube
- Getting started with Pipeline
- Getting started with Pipeline -2
- Git commands with examples
- Git commands with examples to demonstrate their usage
- Hadoop Distributed File System (HDFS) example
- Handling errors with pattern matching in scala
- Handling exceptions in Scala
- Hbase - Hue Installation and login
- Hbase Architecture
- Hbase- What is it?
- Hbase-Why/When use it?
- HDFS Shell Commands
- Here are some interview questions related to HashSet and HashMap:
- Higher-order functions in Scala
- History and development of Scala
- How can I ensure a proper hashCode() implementation?
- How can you enable caching in a Spring Boot application?
- How can you handle exceptions in a Spring Boot application?
- How do you define a function in Scala?
- How do you enable cross-origin resource sharing (CORS) in a Spring Boot application?
- How does Spring Boot handle auto-configuration?
- How does Spring Boot manage bean creation and dependency injection?
- How does Spring Boot simplify the development of Java applications with examples?
- How is the Scala code compiled?
- How is the Scala code compiled?
- How is the Scala code compiled?
- How Kafka automatically handles the distribution of data and management of replicas.
- How many types of Locks are there in JAVA
- How to access HBase columns in Hive,
- How to check if array contains a number in Java with output
- How to convert from DAO to DTO object using ModelMapper in java
- How to find multiple missing number in integer array of 1 to 100 with output?
- How to find duplicate number on Integer array in Java
- How to recover message data lost in apache Kafka with example
- How to resolve circular dependency in spring Framework
- How To retain the last viewed items from the cart in Java across different sessions
- How to use Optional in Java 8
- How you can create a keyspace in Cassandra using the CQL
- How you can use the copy module in an Ansible playbook
- Immutable vs. mutable collections in scala
- Implement Swagger with Spring Boot
- Implementations of equals, hashCode, and toString method in Scala.
- Implementing a cache in Java
- Implementing a database connection using a Singleton class in Java
- Implementing a global configuration using a Singleton class in Java
- Implementing a logging mechanism using a Singleton class in Java
- Implementing a thread pool using a Singleton class in Java
- Implementing a thread pool using the Singleton pattern benefits
- Implementing retries in Apache Kafka involves handling and retrying failed operations in producers and consumers
- Implementing retries in Apache Kafka is essential to handle transient errors
- Implementing Single Sign-On (SSO) in a Spring Boot application
- Import CSV data in Hbase -Hue browser
- In Spring and Spring Boot, @Autowired
- Insert a table record using Hbase Hue
- Install and configure Hadoop on your system
- Install Ansible on your local machine:
- Installing Apache Cassandra on Windows
- Installing Scala and development tools.
- Inter-Service Communication Patterns (Synchronous, Asynchronous, Event-Driven)
- Interacting with the cluster using kubectl.
- Interpreter Pattern
- Interview questions along with their answers on HashSet and HashMap
- Introduction of Azure Databricks
- Introduction to Amazon EKS
- Introduction to Docker
- Introduction to Helm charts
- Introduction to service mesh and Istio
- Introduction to the key features introduced in Java 8
- Introduction to the Stream API
- Inversion of Control (IoC) and Dependency Injection (DI)
- Java - Get a list of all 2-letter language codes defined in ISO 639
- Java (JVM) Memory Model
- Java 10 features
- Java 10 features with examples
- Java 10 features with examples
- Java 8 - Type inference and target typing
- Java 8 – Filter a Map examples
- Java 8 – Stream Collectors groupBy examples
- Java 8 Features
- Java 8 features course
- Java 8 Features with Examples
- Java 8 forEach examples
- Java 8 Functional Interface Examples
- Java 8 Streams filter examples
- Java 9 features along with examples
- Java 9 features with examples
- Java Basic Questions
- Java Coding Standards
- Java Coding Standards
- Java Concurrency
- Java Concurrency: ExecutorService (A better way of asynchronous tasks handling)
- Java Concurrency: ScheduledExecutorService
- Java data structures
- Java design patterns
- Java ExecutorService
- Java Lambda Expressions
- Java program that finds all pairs in an array with a given sum
- Java program to find largest number in an array
- Java Program to find the Missing Number in an Array with output
- Java Program to Replace the Element with its Next Greatest Element, Rightmost Element will be Replaced by 0
- Java Thread : wait() , notify() and notifyAll()
- Java Thread: Comparison of wait(), sleep() and join() methods
- Java Thread: Lifecycle of Thread
- Java Thread: sleep() and interrupt() methods
- Java Thread: yield() method example
- Java.util Package in Java
- Java8 - What is the average salary of each department
- Java8 - Asynchronous programming
- Java8 - Backward compatibility and existing interfaces
- Java8 - Combining and chaining Completable Future instances
- Java8 - Common use cases for stream processing
- Java8 - Creating streams from different data sources
- Java8 - Dealing with null values
- Java8 - Differet ways to use streams-Collectors
- Java8 - Exception handling in CompletableFuture
- Java8 - Formatting and parsing date and time
- Java8 - Functional interfaces
- Java8 - Functional programming concepts in Java
- Java8 - Get the details of highest paid employee in the organization?
- Java8 - Intermediate and terminal operations
- Java8 - Introduction to Completable Future
- Java8 - Introduction to the Nashorn JavaScript engine
- Java8 - Introduction to the Optional class
- Java8 - Local date and time, time zones
- Java8 - Method references
- Java8 - Methods in the Optional class
- Java8 - Multiple inheritance and conflict resolution
- Java8 - Parallel streams for concurrent processing
- Java8 - Periods and durations
- Java8 - Print the name of all departments in the organization
- Java8 - Syntax and usage of default methods
- Java8 - The java.util.function package
- Java8 - Types of method references
- Java8 - Understanding method references
- Java8 - Use cases and best practices for the Optional class
- Java8 - What is the average age of male and female employees?
- Java8 - When and how to use method references
- Java8 -Need for default methods
- Java8 Overview of the java.time package
- Java8- Get the details of youngest male employee in the product development department
- k8s Build and test application using Maven
- Kafka Architecture
- Kafka connect and schema registry in a high-volume environment
- Kafka connect and schema registry in a high-volume environment example in java
- Kafka Offsets example
- Kafka producer and consumer using the Java client API
- Key components: Master, Node, Pods, Services.
- Key concepts in Apache HBase
- Key concepts in Java
- Key features and concepts of Cassandra
- kubernates(K8s) resources Overview
- kubernates(K8s) resources Overview with examples with complete explanation-
- kubernates(K8s) resources Overview with examples with explanation
- Kubernetes cluster concepts
- Kubernetes clusters: Getting started
- Kubernetes concepts and instantiation
- Kubernetes course content
- Kubernetes for Java Developers
- Kubernetes for Java Developers
- Kubernetes workflow for Java developers
- Learning Java
- Linear search is a simple search algorithm
- Linear Search Program in Java
- Lists, arrays, and sequences in Scala
- Load a properties file from classpath
- Load Balancer, Reverse Proxy, and API Gateway
- Load balancing with Zuul
- Main pillars of OOP in Java
- Managing Microservices at Scale: Tools and Best Practices
- Maps and sets in Scala
- Mention the types of Variables in Scala? And What is the difference between them?
- MergeSort alogorithm
- Method references Comparison with lambda expressions
- Metrics Collection and Analysis for Performance Monitoring
- Microservice architecture using Eureka
- Microservice design patterns
- Microservices Architecture code in java
- Microservices Architecture example
- Microservices Course
- Microservices Course Content
- Microservices Tutorial
- Migrating an application to a cluster on AWS
- Minimal Docker image using custom JRE
- Monolithic architecture sample code in java
- monolithic and microservices difference
- Monolithic and Microservices sample code examples in java
- Multiple ways to iterate over a Set
- Object Pool Pattern
- object-level locks and class-level locks in java
- Object-Oriented Programming (OOP)
- OddOccurrencesInArray – Codility – Solution
- Option, Some, and None for handling null values
- Overview of Java data types, variables, and arrays,
- Overview of Kubernetes architecture
- Overview of Kubernetes architecture with examples
- Overview of the evolution of Java
- Overview of the Hadoop architecture
- PairRDDFunctions in Apache Spark
- PassingCars - Count the number of passing cars on the road.
- PassingCars - Count the number of passing cars on the road.
- Performing CRUD (Create, Read, Update, Delete) operations using Spring Boot and JPA (Java Persistence API).
- PlatformTransactionManager
- Proper error handling is essential to avoid data loss when using Kafka.
- Prototype Design Pattern
- Proxy Pattern
- Queue and Deque in Java
- Quick Sort Program in java
- QuickSort algorithm
- React course content
- Read data from Hbase using Spark RDD and Scala
- Reading(Scan) data in a Table using HBase Shell
- Real-time example of implementing Single Sign-On (SSO) in a Spring Boot application
- Recursion and tail recursion
- REPL (Read-Eval-Print Loop) in scala
- Resource sharing scenario using the Singleton design pattern in Java:
- REST API in spring boot
- RESTful API
- Role-Based Authorization in Spring Boot – Spring Security code
- Roll back multiple transactions within the same method
- Running your first Scala program.
- Saga Pattern for Managing Long-lived Transactions
- Scala Control structures(if-else) program
- Scala - collections in Scala
- Scala - Inheritance and polymorphism
- Scala - Multiple ways to iterate over a Map in Scala
- Scala - Traits and mixins
- Scala Break statement
- Scala Collections - List
- Scala Collections – List (sort, foreach)
- Scala Collections – Seq
- Scala Collections List, Sequence, reduceLeft, filter, foldLeft, map and flatMap
- Scala constructor and method
- Scala for-loop and yield
- Scala Hello Program
- Scala Interview Questions:
- Scala Map and flatMap difference
- Scala Map and foreach
- Scala Method Overloading
- Scala Method Overriding
- Scala multi dimensionalArray
- Scala object and class
- Scala Set ,Union and Intersect
- Scala Set and foreach
- Scala Single dimensionalArray
- Scala Singleton Object
- Scala topics with programs
- Scala topics with programs
- Scala Topics:
- Scala Topics:
- Scala Topics:
- Scala trait,extends,with and Unit
- Scala try catch and finally
- Scala Tuple (Return Multiple Values)
- Scala Tutorial
- Scala Tutorial and concepts
- Scala Variables and Data Types
- Scala Variables and Data Types program
- Scala while and do/while loop
- Scala with HBase -Read, Insert and Update operations
- Scala with JDBC connection and SQL DELETE
- Scala with JDBC connection and SQL INSERT
- Scala with JDBC connection and SQL SELECT
- Scala with JDBC connection and SQL UPDATE
- Scala- call a method of an object
- Scala- Case classes and pattern matching
- Scan(Read) a Hbase Table data using Java
- ScheduledExecutorService with Runnable
- Securing Kafka messaging
- Security Concerns in Microservices Architecture
- Seq and List differences in Scala
- Service Discovery and Load Balancing in Microservices
- Set the time to Delete the data after 7 days using HBase TTL (Time To Live)
- Setting up a local development cluster with tools like Minikube
- Short cut keywords to write java code in IntelliJ IDEA tool
- Single Responsibility Principle and its Application
- Singleton design pattern in Java
- Singleton design pattern in Java
- Software Architecture: Patterns for Developers
- Solve the passing Car Codility Problem.
- Some cases where using the Singleton pattern can be beneficial
- Some cases where using the Singleton pattern can be beneficial
- some common array-related interview questions in Java
- Some essential concepts and steps to get you started with Kafka.
- Some Java interview questions related to array pairs
- Some of the important Java 8 features are
- Sort a list in Java 8
- Sort map by Key using Comparator
- Sort Map by key/value using Stream APIs
- Sorting a Map in Java 8
- Spark - an ETL example in Apache Spark using Scala with sample code
- Spark - Apache Spark Architecture
- Spark - Configuring resources in Apache Spark
- Spark - Datasets in Apache Spark
- Spark - Different ways to create RDD in Scala
- Spark - Examples of RDD Actions in Apache Spark
- Spark - Examples of RDD Actions in Apache Spark
- Spark - Pair RDD Functions in scala
- Spark - RDD Actions in scala
- Spark - RDD Transformations in scala
- Spark - Read data from Hbase using Spark and Scala
- Spark - Resource allocation in Apache Spark
- Spark - Set up an Apache Spark environment
- Spark - What is the default number of partitions for an RDD or DataFrame In Apache Spark
- Spark -About Apache Spark
- Spark -Driver memory allocation in Apache Spark
- Spark -How to work with partitions in Apache Spark RDDs and DataFrames
- Spark -Read files in various formats using the appropriate Spark API
- Spark -Some DataFrame examples using Scala in Apache Spark
- Spark – SQL Schema in scala
- Spark –read ,write and delete files in scala
- Spark Resilient Distributed Datasets (RDDs)
- Spark SQL - DataFrame Examples in Scala
- Spark SQL - DataSet Examples in Scala
- Spark- Create an empty RDD
- Spark-Apache Spark RDD (Resilient Distributed Dataset) examples in Scala
- Spring @Qualifier Annotation with example
- Spring Boot Annotations
- Spring Boot application with JPA (Java Persistence API) for performing CRUD (Create, Read, Update, Delete) operations
- Spring boot Architecture
- Spring boot tutorial
- SQL Interview Questions
- Stateless and stateful authentication
- Strategy Pattern in java
- Syntax and basic examples
- Template Pattern
- Ternary search algorithm:
- Test-driven development (TDD) practices.
- Testing Strategies for Microservices (Unit, Integration, Contract, End-to-End)
- The @FunctionalInterface annotation
- The architecture of a Spring Boot application
- The basic command to create a Kafka topic
- The basic concepts and steps to get you started with Docker:
- The Chain of Responsibility pattern offers advantages
- The Chain of Responsibility pattern offers disadvantages
- The error message "The input line is too long. The syntax of the command is incorrect."
- The genesis of Java
- The Interface Segregation Principle (ISP)
- The Liskov Substitution Principle (LSP)
- The SOLID principles
- The SOLID principles
- Time To Live (TTL)
- To create a Kafka consumer and consume messages from a Kafka topic
- To create a Kafka producer and send messages to a Kafka topic
- To deploy an application with two deployments in Kubernetes,
- To deploy Istio resources on your Kubernetes cluster,
- To find the Kth smallest or largest element in an unsorted array in Java
- To install Istio on Amazon EKS (Elastic Kubernetes Service)
- To submit form data with React on the front end and a Spring Boot application on the back end
- Top 10 use cases of Databricks
- Types of services in Kubernetes
- Understanding the Kubernetes API with examples
- Understanding the Kubernetes API.
- Understanding the motivations behind the changes
- Understanding the Scala REPL (Read-Eval-Print Loop).
- Unix Commands
- Update a Hbase Table data using Java
- Update Hbase Table data in HIVE and Impala
- Use Cases and Real-world Examples in micro services
- User Logging and Tracing in Microservices
- Using Nashorn for scripting in Java applications
- Using Try, Success, and Failure for error handling in scala
- Various examples of Ansible scripts (playbooks)
- Various ways to reverse a string in Java.
- Web and application servers list
- What are different Spring Bean Scopes?
- What are lambda expressions?
- What are Microservices?
- What are some other data structures that use hashing?
- What are the consequences of not overriding hashCode() and equals() correctly in a HashMap?
- What are the different types of software architectural styles?
- What are the different ways to configure properties in a Spring Boot application?
- What are the different ways to deploy a Spring Boot application?
- What are the key data structures in Apache Spark
- What are the main trade-offs between a lower and higher load factor in a HashMap?
- What is an Auxiliary constructor in Scala?
- what is anaconda and scala
- what is anaconda and scala
- What is Apache Spark
- What is Case in Scala?
- What is Data Frame in Apache Spark
- What is difference between creating String as new and literal?
- what is Functional Collections in Scala
- what is Functional Collections in Scala
- What is Hadoop
- What is IoC (Inversion of Control)
- what is npm and Node.js
- What is RDD in apache Spark
- What is Recursion tail in Scala?
- What is Scala?
- What is Scala?
- What is Scala?
- what is SiteMinder and SSO implementation
- What is Spring Boot
- What is Spring Boot, and what are its main features with examples?
- What is Spring Boot, and what are its main features?
- What is Spring Data JPA, and how is it used in a Spring Boot application?
- what is synchronization in java
- What is the 12 factor methodology in microservices?
- What is the best way to implement the Singleton class
- What is the purpose of the @SpringBootApplication annotation in a Spring Boot application?
- what is Thread-Safety in Java
- What is Type inference in Scala
- When and where to use Apache Spark
- When to use RDDs, Datasets, and DataFrames
- Where to use Scala
- Which Azure Data Factory components should you use to connect to a data source?
- Why is an Option used in Scala?
- Why Kubernetes?
- Why Scala prefers Immutability?
- Why we need design patterns in java
- Window functions in Spark SQL (Databricks)
- Work with a Docker container
- Working with Workspace Objects in Azure Databricks
- Write a Java program to connect to a SQL DataBase.
- Write a java program to display a simple string.
- Write a Java program to implement a Binary Search Algorithm.
- Write a Java program to implement HeapSort Algorithm.
- Write a Java program to implement HeapSort Algorithm.
- Write a Java program to print the nodes present in the Circular LinkedList
- Write a Java program to remove elements from an ArrayList
- Write a java program which show Hello world!
- Write a logic to determine and convert given primitive type to its wrapper class and return result
- Write a program in Java to implement HashMap.
- Write a program that calculates the area of a circle, use data type of double.
- Write a program that convert one data type in to another data type
- Write a program that demonstrate if-else statement
- Write a program that demonstrates the Boolean type values.
- Write a program to compute distance light travel in 1000 days using long variables.
- write a program to demonstrate the for loop.
- Write a program to demonstrates the lifetime of a variable.
- Write a program to find intersection of two sorted arrays in Java with output
- Write a program to reverse an array or string
- Write a program which contains block of code in “for” loop definition.
- Write a program which demonstrate dynamic initialization.
- Write a program which demonstrate the arithmetic operator
- Write a program which demonstrate the arithmetic operator
- Write a program which demonstrate the if statement.
- Write a program which demonstrates the Ternary (?) operator.
- Write a program which show the effect of nested scopes.
- Write a program which shows the function of increment(++).
- Write a programme left shifting the byte value.
- Write a programme that demonstrate modulus operator
- Write a programme that demonstrate modulus operator
- Write a programme that demonstrate the Boolean logical operator
- Write a programme that show simple example of switch
- Write a simple java program to display a string and perform a simple multiplication.
- Writing data in a Table using HBase Shell
- You are building an Azure Stream Analytics pipeline. You need to configure the pipeline to analyze events that occur during a five-minute window after an event fires. Which windowing function should you use?
- You create an Azure Stream Analytics job. You run the job for five hours. You need to ensure that these events are not dropped. What should you do?
- You design an Azure Data Factory data flow activity to move large amounts of data from text files to an Azure Synapse Analytics database. You add a data flow script to your data flow. The data flow in the designer has the following tasks: distinctRows1: Aggregate data by using myCols that produce columns. source1: Import data from DelimitedText1. derivedColumn1: Create and update the C1 columns. select1: Rename derivedColumn1 as select1 with columns C1. sink1: Add a sink dataset. You need to ensure that all the rows in source1 are deduplicated. What should you do?
- You have 500 IoT devices and an Azure subscription. You plan to build a data pipeline that will process real-time data from the devices. You need to ensure that the devices can send messages to the subscription. What should you deploy?
- You have a Delta Lake solution that contains a table named table1. You need to roll back the contents of table1 to 24 hours ago. Which command should you run?
- You have an Azure Data Factory pipeline named Pipeline1. Which two types of triggers can you use to start Pipeline1 directly? Each correct answer presents a complete solution.
- You have an Azure Data Factory pipeline named Pipeline1. You need to send an email message if Pipeline1 fails. What should you do?
- You have an Azure Stream Analytics solution that receives data from multiple thermostats in a building. You need to write a query that returns the average temperature per device every five minutes for readings within that same five minute period. Which two windowing functions could you use?
- You have an Azure subscription that contains a Delta Lake solution. The solution contains a table named employees. You need to view the contents of the employees table from 24 hours ago. You must minimize the time it takes to retrieve the data. What should you do?
- You have an Azure subscription that contains the following resources
- You need to ensure that all changes to DB1 are stored in DW1. The solution must meet the following requirements:
- You need to ensure that all changes to DB1 are stored in DW1.The solution must capture the new value and the existing value and store each value as a new record.
- You need to ensure that all changes to DB1 are stored in DW1.The solution must capture the new value and the existing value and store each value as a new record.
- You plan to configure an Azure Stream Analytics job named Job1.
- You plan to use an Azure Synapse pipeline to copy CSV files from the branch office, perform complex transformations on their content, and then load them to DB1.